Top Parlor Gets Color November 2, 2008 0
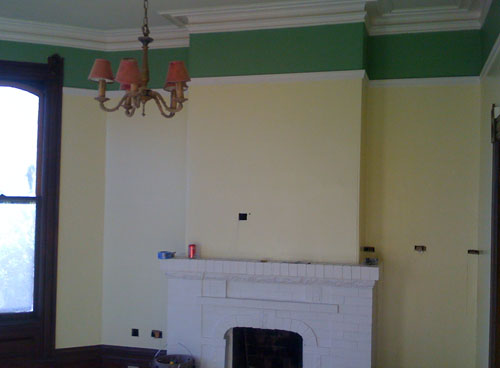
Although there is much more work to do on the top parlor, we have finally decided on color choices. I think it has turned out quite well, sans the brown molding. We chose Behr’s ‘Garden Path’ for the top portion and Benjamin Moore’s ‘Weston Flax’ for rest. A lot more updates are on the way including swatches, furniture, and painting the hideous brown colored molding. For now this will have to do. Oh yea, and don’t mind those holes either. That’s where we are wiring up our sound system and television.
To see all the pictures for this project click here.
Updating the Craftsman Dining Room October 28, 2008 1
When we moved in, we immediately started figuring out our order operations; what was most important to us. It turned out to be a nice living area, a place to eat, and a kitchen. That being said, our kitchen was done, we had a temporary living room downstairs, so it was off to the dining room. My housemate loves to cook and I love to entertain so the dining room seemed to be a logical choice.
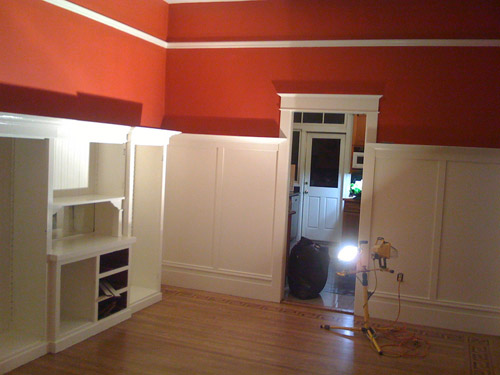
What a choice that turned out to be! At first glance, we thought we may keep the wood as is, just sand and refinish. Upon further inspection, the wood was cheap plywood and it had been glazed over numerous times. Even if we wanted to refinish it, that cheap plywood would still show through. So, we decided to paint.
After days and days of sanding and scraping off the old glaze it was finally time for a primer. We went with an oil based primer to bond with the oil based glaze that we had scuffed and sanded to create mechanical bond. That in itself was a daunting task. The stuff goes on thick but it was worth it. After a thick coat of primer applied a latex final coat of white. Well, three coats to be exact. We really wanted a deep rich white and that’s what it takes. Many many coats.
The same holds true for the wall color that we chose. It is Behr’s “Old Flame”. It came out beautifully but took numerous coats. If out anyone knows anything about painting red it can be a royal pain. If you’re going to embark on this journey, don’t lie to yourself. It will take a minimum of three coats end of story. Brace yourself. In our case, it took four! But as you can from the results, its totally worth it.
Seismic Retrofitting Begins October 10, 2008 6
Although this house has stood proudly on the hill for over 120 years in a seismically active part of the world, its still in our best interest to shore up the foundation. Luckily for us, this house held up through the big 1906 earthquake as well as the one in 1989 due to the fact that is built on solid bedrock. Its quite remarkable considering the foundation is made of brick and mortar and the house is held to it with gravity alone. After all is said and done, this house should stand for at least a hundred more years.
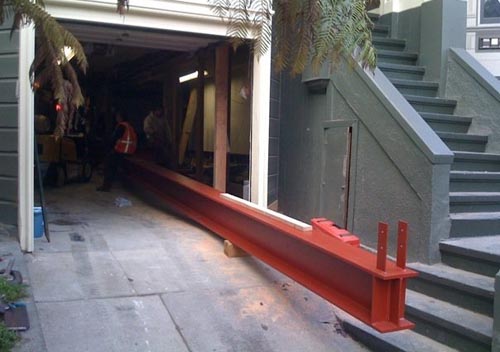
 In order to update our aging foundation, we are doing what the experts call a “cap and raise”. That means they are going to raise the sill plate that currently sits on the brick, drill holes for large bolts to attach to the sill, epoxy rebar into drilled holes in the bricks, and encase the whole thing in high strength concrete. If you click on the picture to your right, you should be able to see a closeup of what is actually going on here. In addition, we are having two large steel girders put in to help support the front of the house in place of an old wood beam and turnbuckle system. How this house held up so long is quite incredible.
For more photos on this project click here.
Refinishing the Floors September 28, 2008 0
This is not a job for faint of heart which is why we opted for this job to be done by the professionals. One might think to themselves, “hey I can sand, why not do them myself?”. Wrong! If you’re refinishing one small room, maybe. Even then, it will take you at least a weekend with some trial and error not to mention tool rentals and back breaking work. This is not something you want to attempt with a Craftsman belt sander and a few friends.
Do what we did and hire an expert. In this case, we called Jesus Estrada, owner and operator of Architectural Floors. Him and his crew were in an out in less than a week and thats doing over 2,000 square feet! They paid close attention to all the little nuances of our 120 year old floors. Our floors are not tongue and grove but flat white oak nailed right to the subfloor. Also, each room has decorative inlay, some are very intricate and some are simple bands of cherry around the room.
In any case, Jesus and his crew reset every single nail in the entire house, sanded all the floors down, completely puttied them, and sanded again. Then, and only then could they put on a coat of chestnut stain and three coats of varnish. This was no small job and we are quite happy with the results.
See more photos of the floors here.
Let the Restoration Begin! September 16, 2008 3

The project is an 1890 San Francisco Victorian house. Â Over the years it has been through a lot. Â Its seen two massive earthquakes, a series of negligent owners, and a whole lot of ugly wallpaper but its still standing. Luckily, my housemate and I are here to restore it to its original grandeur with some updated amenities as well.
When we got it, it had recently been converted back into a one family home as it was originally intended.  At some point along the way, it was converted into to separate units and a lot of that can still be seen all over the house.  For example, the kitchen is on the second floor!  The previous owner decided to remodel it there rather than bring it back downstairs but thats another story for another post.  There are also still two gas meters as well as two electrical boxes.  Its going to take a lot of work to bring it back to its original glory but we’re up to the task.
Hopefully over the years we will be able to discover more about the house’s history but its going to be a challenge.  After the 1906 earthquake a massive fire ensued and burned almost all the records of the home.  The only records that remained were the water records which were stored in another location.  Thats the only thing linking this house to the year it was built, 1890. So stay tuned as we document the houses history, renovation, and hopefully its rich history though all the years its been sitting on this hill.
See the photos from the open house here


